Metadata-Version: 2.1
Name: cellacdc
Version: 1.3.0
Summary: Cell segmentation, tracking and event annotation
Home-page: https://github.com/SchmollerLab/Cell_ACDC
Author: Francesco Padovani and Benedikt Mairhoermann
Author-email: francesco.padovani@helmholtz-muenchen.de
Project-URL: Author contact, https://schmollerlab.com/francescopadovani
Project-URL: Schmoller lab, https://schmollerlab.com/
Keywords: live-cell imaging,cell segmentation,cell tracking,cell cycle annotations,image analysis
Classifier: Development Status :: 3 - Alpha
Classifier: Programming Language :: Python :: 3 :: Only
Classifier: Programming Language :: Python :: 3.8
Classifier: Programming Language :: Python :: 3.9
Classifier: Programming Language :: Python :: 3.10
Classifier: License :: OSI Approved :: BSD License
Classifier: Intended Audience :: Education
Classifier: Intended Audience :: Science/Research
Classifier: Operating System :: Microsoft :: Windows
Classifier: Operating System :: POSIX
Classifier: Operating System :: Unix
Classifier: Operating System :: MacOS
Classifier: Topic :: Scientific/Engineering
Classifier: Topic :: Scientific/Engineering :: Bio-Informatics
Classifier: Topic :: Scientific/Engineering :: Information Analysis
Classifier: Topic :: Scientific/Engineering :: Image Processing
Classifier: Topic :: Scientific/Engineering :: Visualization
Classifier: Topic :: Utilities
Requires-Python: >=3.8
Description-Content-Type: text/markdown
License-File: LICENSE
Requires-Dist: numpy
Requires-Dist: opencv-python-headless
Requires-Dist: natsort
Requires-Dist: h5py
Requires-Dist: PyQt5 (>5.15)
Requires-Dist: pyqtgraph (>=0.13.3)
Requires-Dist: scikit-image (>=0.18)
Requires-Dist: tqdm
Requires-Dist: matplotlib (>=3.5)
Requires-Dist: seaborn
Requires-Dist: scikit-learn
Requires-Dist: psutil
Requires-Dist: boto3
Requires-Dist: requests
Requires-Dist: setuptools-scm
Provides-Extra: all
Requires-Dist: torchvision ; extra == 'all'
Requires-Dist: tensorflow ; extra == 'all'
Provides-Extra: pytorch
Requires-Dist: torchvision ; extra == 'pytorch'
Provides-Extra: tensorflow
Requires-Dist: tensorflow ; extra == 'tensorflow'
Provides-Extra: tf
Requires-Dist: tensorflow ; extra == 'tf'
Provides-Extra: torch
Requires-Dist: torchvision ; extra == 'torch'
#  Cell-ACDC
### A GUI-based Python framework for **segmentation**, **tracking**, **cell cycle annotations** and **quantification** of microscopy data
*Written in Python 3 by [Francesco Padovani](https://github.com/ElpadoCan) and [Benedikt Mairhoermann](https://github.com/Beno71).*
[](https://github.com/SchmollerLab/Cell_ACDC/actions)
[](https://github.com/SchmollerLab/Cell_ACDC/actions)
[](https://github.com/SchmollerLab/Cell_ACDC/actions)
[](https://www.python.org/downloads/)
[](https://pypi.org/project/cellacdc/)
[](https://pepy.tech/project/cellacdc)
[](https://github.com/SchmollerLab/Cell_ACDC/blob/main/LICENSE)
[](https://github.com/SchmollerLab/Cell_ACDC)
[](https://bmcbiol.biomedcentral.com/articles/10.1186/s12915-022-01372-6)
Cell-ACDC
### A GUI-based Python framework for **segmentation**, **tracking**, **cell cycle annotations** and **quantification** of microscopy data
*Written in Python 3 by [Francesco Padovani](https://github.com/ElpadoCan) and [Benedikt Mairhoermann](https://github.com/Beno71).*
[](https://github.com/SchmollerLab/Cell_ACDC/actions)
[](https://github.com/SchmollerLab/Cell_ACDC/actions)
[](https://github.com/SchmollerLab/Cell_ACDC/actions)
[](https://www.python.org/downloads/)
[](https://pypi.org/project/cellacdc/)
[](https://pepy.tech/project/cellacdc)
[](https://github.com/SchmollerLab/Cell_ACDC/blob/main/LICENSE)
[](https://github.com/SchmollerLab/Cell_ACDC)
[](https://bmcbiol.biomedcentral.com/articles/10.1186/s12915-022-01372-6)
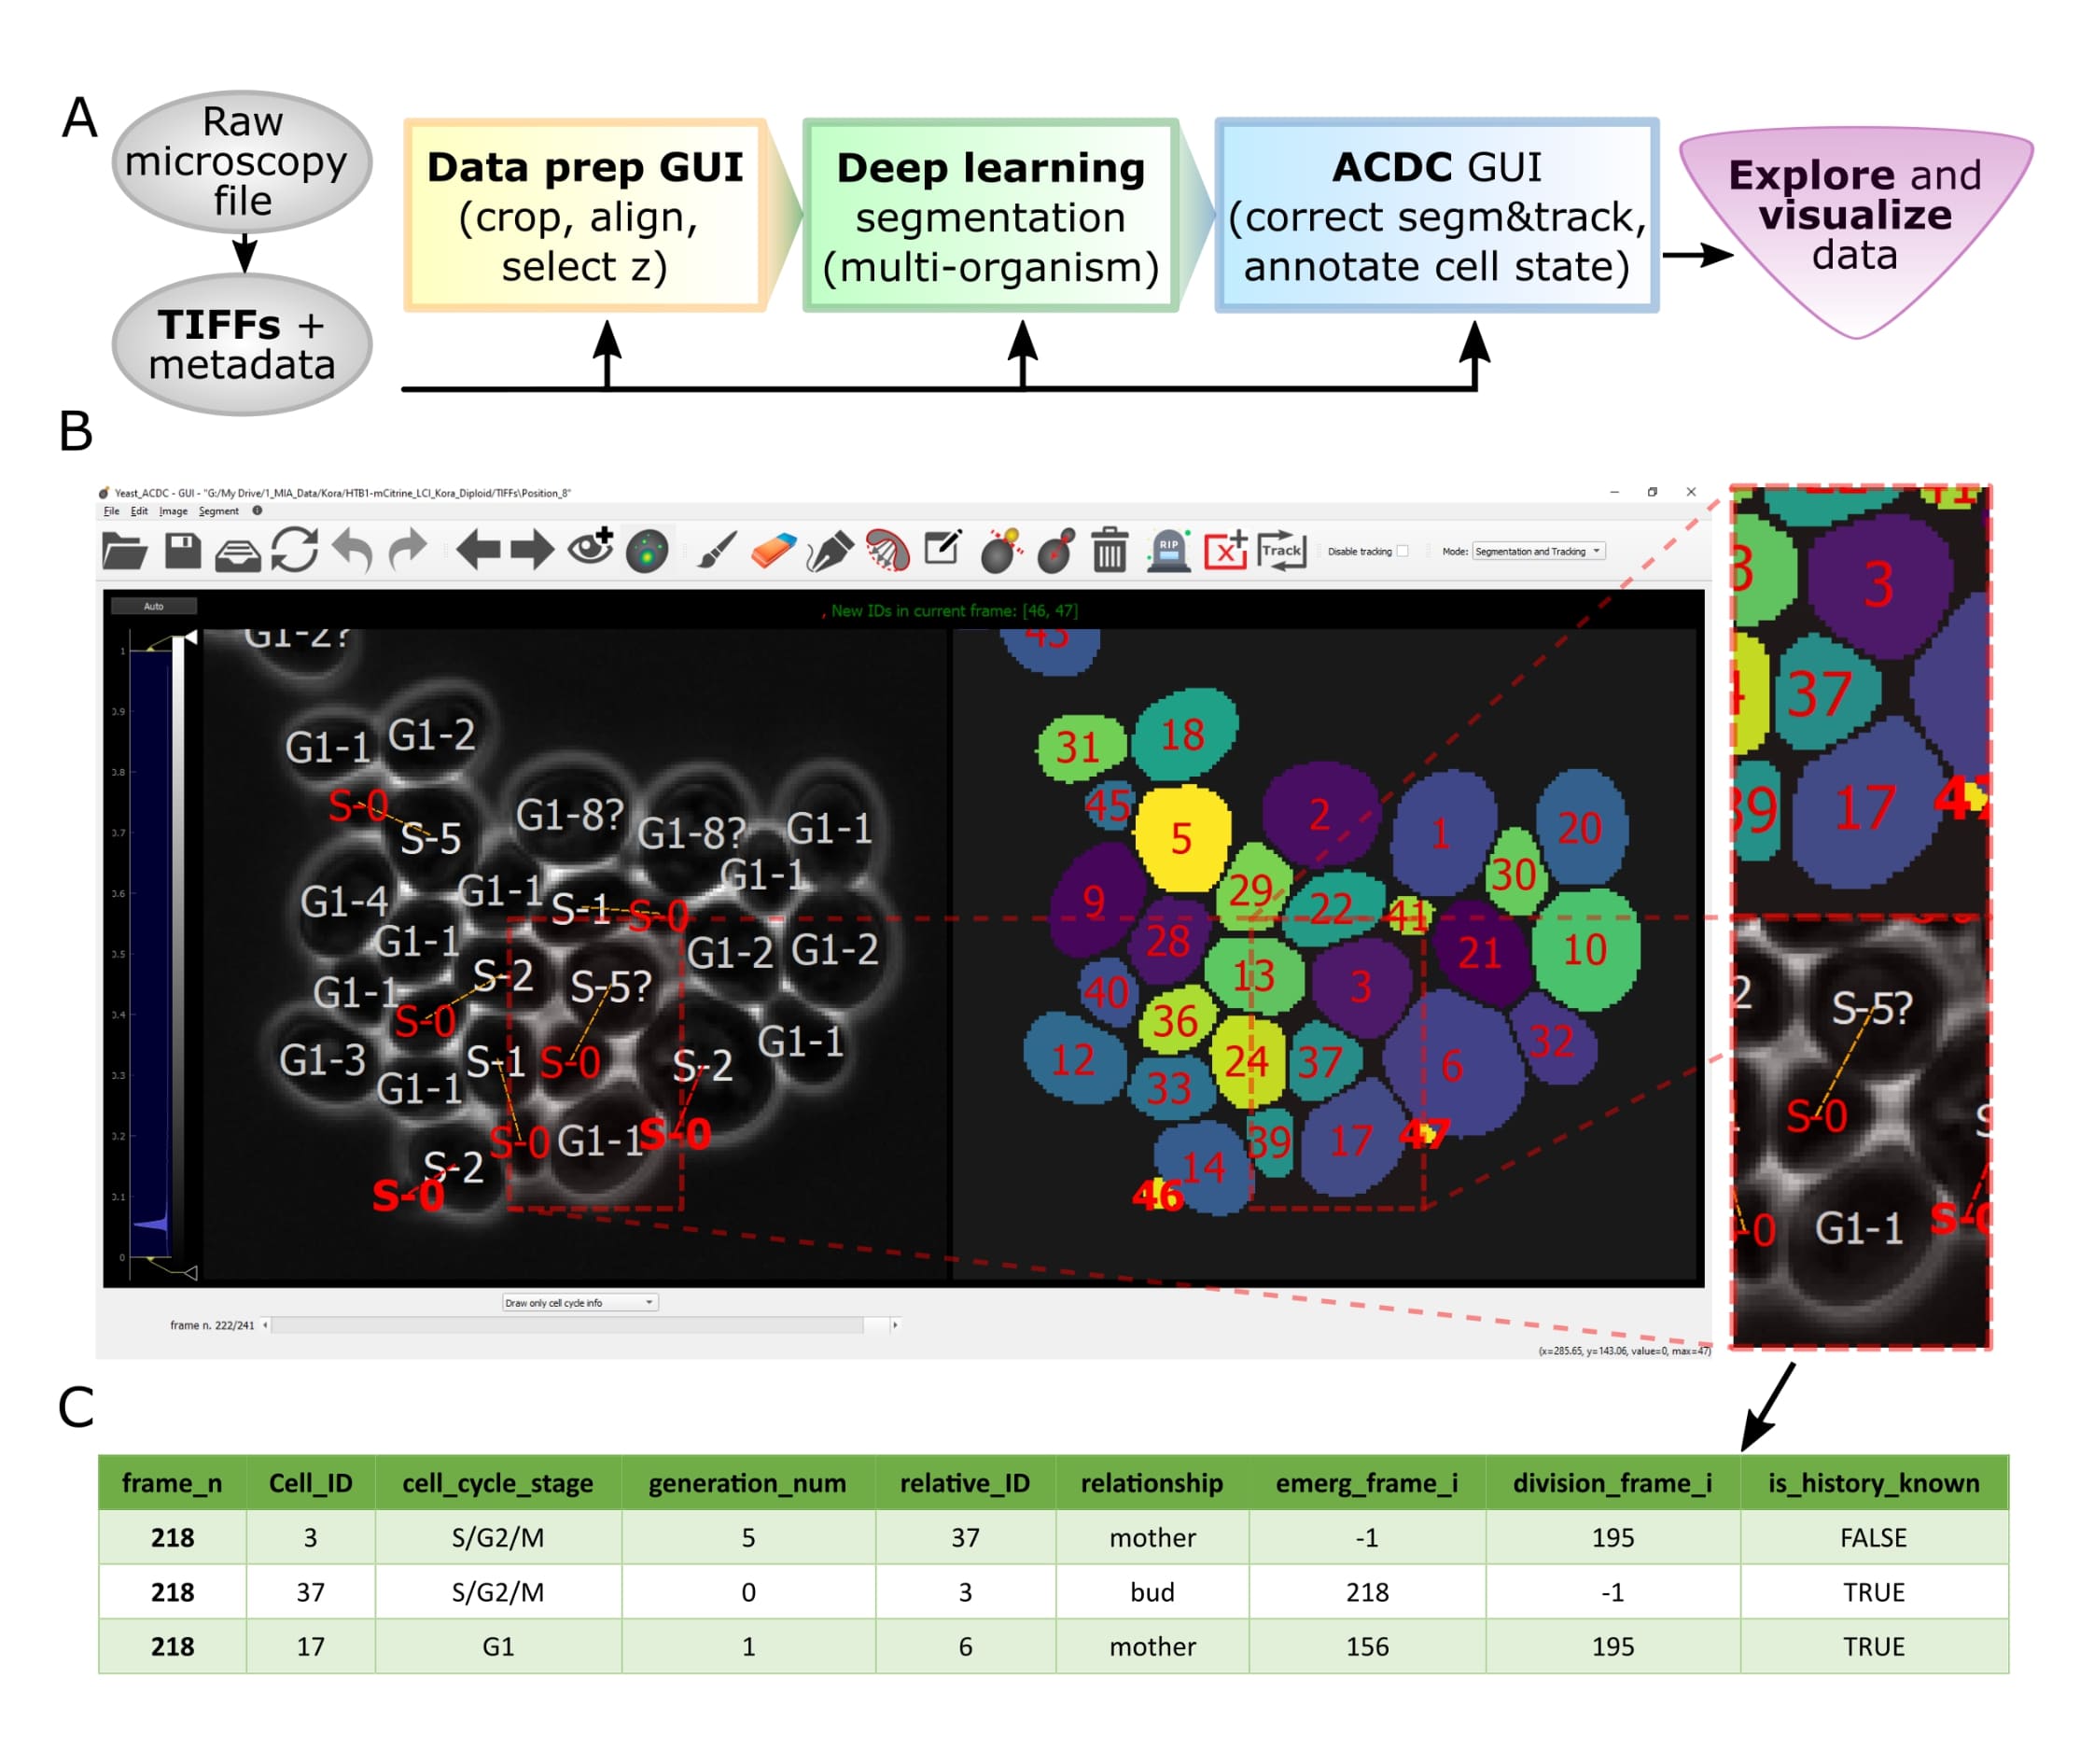 Overview of pipeline and GUI
## Resources
- [Installation](#installation-using-anaconda-recommended)
- [User Manual](https://github.com/SchmollerLab/Cell_ACDC/blob/main/UserManual/Cell-ACDC_User_Manual.pdf) with **detailed instructions**
- [Publication](https://bmcbiol.biomedcentral.com/articles/10.1186/s12915-022-01372-6) of Cell-ACDC
- [Forum](https://github.com/SchmollerLab/Cell_ACDC/discussions) for discussions (feel free to **ask any question**)
- **Report issues, request a feature or ask questions** by opening a new issue [here](https://github.com/SchmollerLab/Cell_ACDC/issues).
- Twitter [thread](https://twitter.com/frank_pado/status/1443957038841794561?s=20)
## Citation
If you use Cell-ACDC in your publication, please cite:
> Francesco Padovani, Benedikt Mairhörmann, Pascal Falter-Braun,
> Jette Lengefeld, and Kurt M. Schmoller
> _Segmentation, tracking and cell cycle analysis of live-cell imaging data with
> Cell-ACDC_. BMC Biol 20, 174 (2022)
> https://doi.org/10.1186/s12915-022-01372-6
## How to contribute
Contributions to Cell-ACDC are always very welcome! For more details see instructions [here](https://github.com/SchmollerLab/Cell_ACDC/blob/main/CONTRIBUTING.rst).
## Overview
Let's face it, when dealing with segmentation of microscopy data we often do not have time to check that **everything is correct**, because it is a **tedious** and **very time consuming process**. Cell-ACDC comes to the rescue!
We combined the currently **best available neural network models** (such as [Segment Anything Model (SAM)](https://github.com/facebookresearch/segment-anything), [YeaZ](https://www.nature.com/articles/s41467-020-19557-4),
[cellpose](https://www.nature.com/articles/s41592-020-01018-x), [StarDist](https://github.com/stardist/stardist), [YeastMate](https://github.com/hoerlteam/YeastMate), [omnipose](https://omnipose.readthedocs.io/), [delta](https://gitlab.com/dunloplab/delta), etc.) and we complemented them with a **fast and intuitive GUI**.
We developed and implemented several smart functionalities such as **real-time continuous tracking**, **automatic propagation** of error correction, and several tools to facilitate manual correction, from simple yet useful **brush** and **eraser** to more complex flood fill (magic wand) and Random Walker segmentation routines.
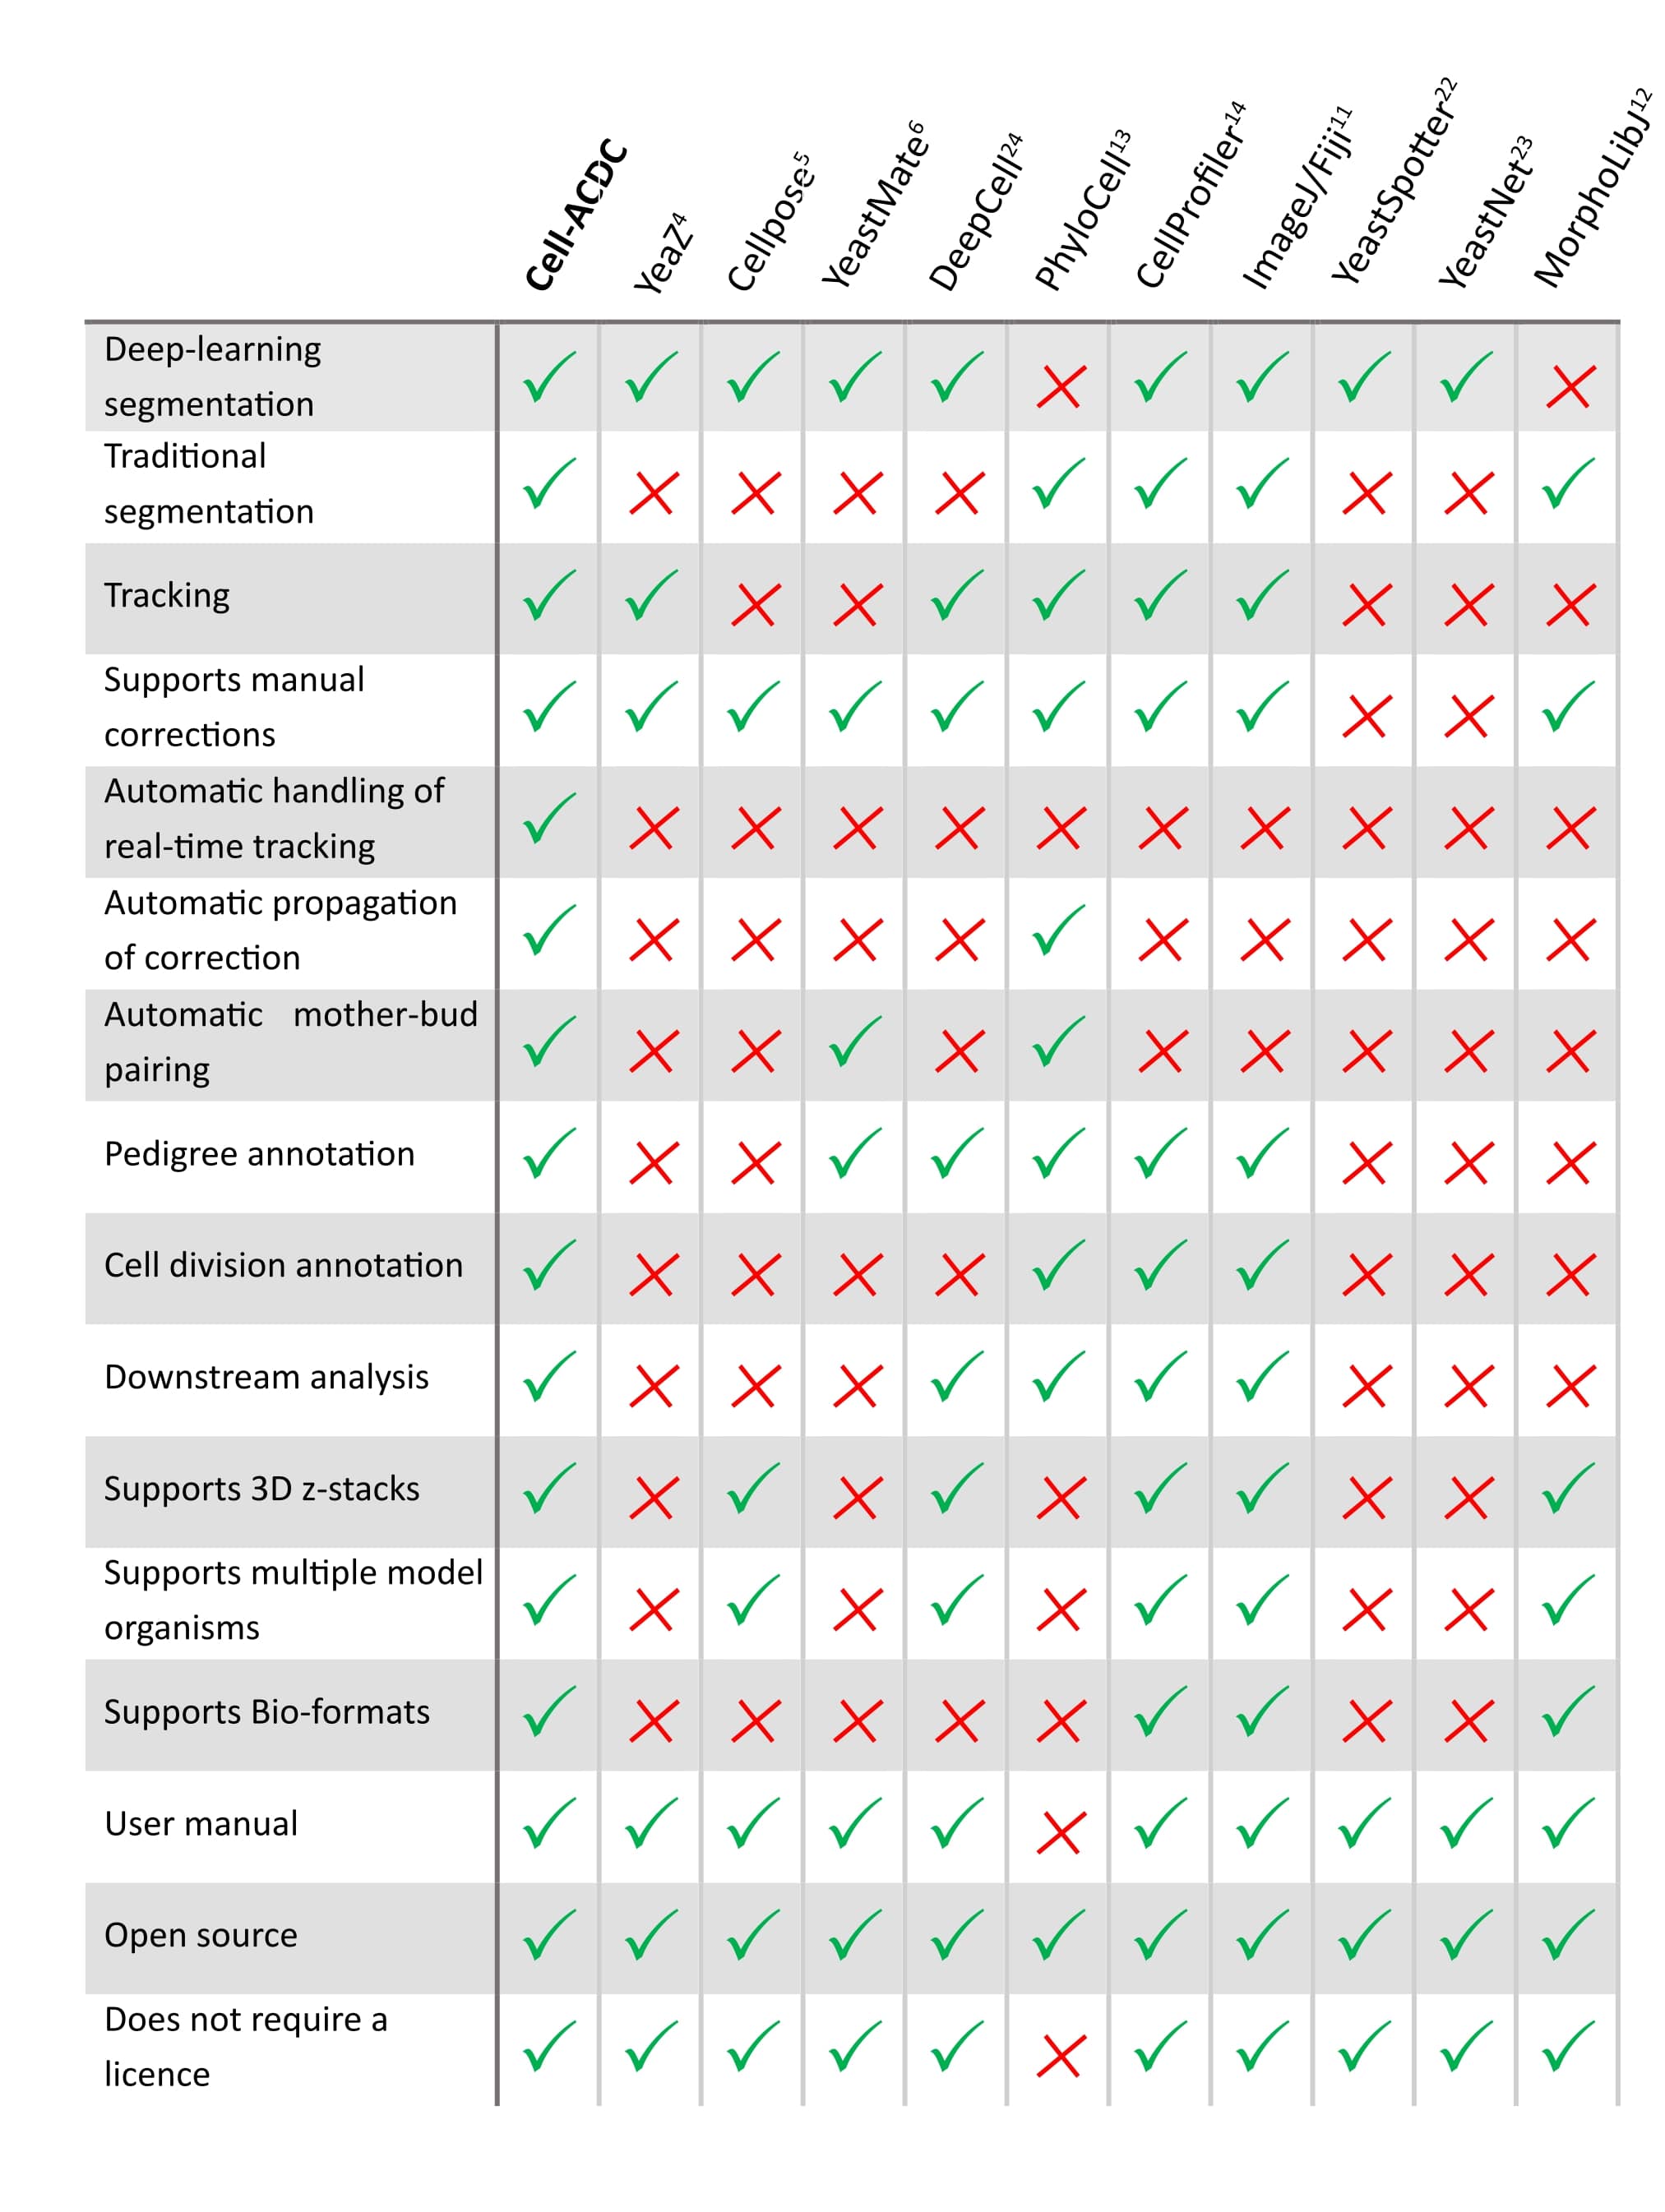
See below **how it compares** to other popular tools available (*Table 1 of our [publication](https://bmcbiol.biomedcentral.com/articles/10.1186/s12915-022-01372-6)*).
## Is it only about segmentation?
Of course not! Cell-ACDC automatically computes **several single-cell numerical features** such as cell area and cell volume, plus the mean, max, median, sum and quantiles of any additional fluorescent channel's signal. It even performs background correction, to compute the **protein amount and concentration**.
You can load and analyse single **2D images**, **3D data** (3D z-stacks or 2D images over time) and even **4D data** (3D z-stacks over time).
Finally, we provide Jupyter notebooks to **visualize** and interactively **explore** the data produced.
**Do not hesitate to contact me** here on GitHub (by opening an issue) or directly at my email [padovaf@tcd.ie](mailto:padovaf@tcd.ie) for any problem and/or feedback on how to improve the user experience!
## Update v1.2.4
First release that is finally available on PyPi.
Main new feature: custom trackers! You can now add any tracker you want by implementing a simple tracker class. See the [manual](https://github.com/SchmollerLab/Cell_ACDC/blob/main/UserManual/Cell-ACDC_User_Manual.pdf) at the section "**Adding trackers to the pipeline**".
Additionally, this release includes many UI/UX improvements such as color and style customisation, alongside a inverted LUTs.
## IMPORTANT: Before installing
If you are **new to Python** or you need a **refresher** on how to manage scientific Python environments, I highly recommend reading [this guide](https://focalplane.biologists.com/2022/12/08/managing-scientific-python-environments-using-conda-mamba-and-friends/) by Dr. Robert Haase BEFORE proceeding with Cell-ACDC installation.
## Installation using Anaconda (recommended)
*NOTE: If you don't know what Anaconda is or you are not familiar with it, we recommend reading the detailed installation instructions found in manual [here](https://github.com/SchmollerLab/Cell_ACDC/blob/main/UserManual/Cell-ACDC_User_Manual.pdf).*
1. Install [Anaconda](https://www.anaconda.com/products/individual) or [Miniconda](https://docs.conda.io/en/latest/miniconda.html) for **Python 3.9**. *IMPORTANT: For Windows make sure to choose the **64 bit** version*.
2. Open a terminal. On Windows, use the Anaconda Prompt and NOT the Command Prompt.
3. Update conda with `conda update conda`. Optionally, consider removing unused packages with the command `conda clean --all`
4. Create a virtual environment with the command `conda create -n acdc python=3.9`
5. Activate the environment `conda activate acdc`
6. Upgrade pip with the command `python -m pip install --upgrade pip`
7. Install Cell-ACDC with the command `pip install cellacdc`. Note that if you know you are going to **need tensorflow** (for segmentation models like YeaZ) you can run the command `pip install "cellacdc[all]"`, or `pip install tensorflow` before or after installing Cell-ACDC.
## Installation using Pip
1. Download and install [Python 3.9](https://www.python.org/downloads/)
2. Open a terminal. On Windows we recommend using the PowerShell that you can install from [here](https://docs.microsoft.com/it-it/powershell/scripting/install/installing-powershell-on-windows?view=powershell-7.2#installing-the-msi-package). On macOS use the Terminal app.
3. Upgrade pip: Windows: `py -m pip install --updgrade pip`, macOS/Unix: `python3 -m pip install --updgrade pip`
4. Navigate to a folder where you want to create the virtual environment
5. Create a virtual environment: Windows: `py -m venv acdc`, macOS/Unix `python3 -m venv acdc`
6. Activate the environment: Windows: `.\acdc\Scripts\activate`, macOS/Unix: `source acdc/bin/activate`
7. Install Cell-ACDC with the command `pip install cellacdc`. Note that if you know you are going to **need tensorflow** (for segmentation models like YeaZ) you can run the command `pip install "cellacdc[all]"`, or `pip install tensorflow` before or after installing Cell-ACDC.
## Install from source
If you want to try out experimental features (and, if you have time, maybe report a bug or two :D), you can install the developer version from source as follows:
1. Install [Anaconda](https://www.anaconda.com/products/individual) or [Miniconda](https://docs.conda.io/en/latest/miniconda.html).
2. Open a terminal and navigate to a folder where you want to download Cell-ACDC. If you are on Windows you need to use the "Anaconda Prompt" as a terminal. You should find it by searching for "Anaconda Prompt" in the Start menu.
3. Clone the source code with the command `git clone https://github.com/SchmollerLab/Cell_ACDC.git`. If you are on Windows you might need to install `git` first. Install it from [here](https://git-scm.com/download/win).
4. Navigate to the `Cell_ACDC` folder with the command `cd Cell_ACDC`.
5. Update conda with `conda update conda`. Optionally, consider removing unused packages with the command `conda clean --all`
6. Create a new conda environment with the command `conda create -n acdc_dev python=3.9`
7. Activate the environment with the command `conda activate acdc_dev`
8. Upgrade pip with the command `python -m pip install --upgrade pip`
9. Install Cell-ACDC with the command `pip install -e .`. The `.` at the end of the command means that you want to install from the current folder in the terminal. This must be the `Cell_ACDC` folder that you cloned before.
10. OPTIONAL: If you need tensorflow run the command `pip install tensorflow`.
### Updating Cell-ACDC installed from source
To update Cell-ACDC installed from source, open a terminal window, navigate to the Cell_ACDC folder and run the command
```
git pull
```
Since you installed with the `-e` flag, pulling with `git` is enough.
## Install from source with forking
If you want to contribute to the code or you want to have a developer version that is fixed in time (easier to get back to in case we release a bug :D) we recommend forking before cloning:
1. Install [Anaconda](https://www.anaconda.com/products/individual) or [Miniconda](https://docs.conda.io/en/latest/miniconda.html).
2. Create a personal [GitHub account](https://github.com) and log in.
3. Go to the Cell-ACDC [GitHub page](https://github.com/SchmollerLab/Cell_ACDC) and click the "Fork" button (top-right) to create your own copy of the project.
4. Open a terminal and navigate to a folder where you want to download Cell-ACDC. If you are on Windows you need to use the "Anaconda Prompt" as a terminal. You should find it by searching for "Anaconda Prompt" in the Start menu.
5. Clone the forked repo with the command `git clone https://github.com/your-username/Cell_ACDC.git`. Remember to replace the `your-username` in the command. If you are on Windows you might need to install `git` first. Install it from [here](https://git-scm.com/download/win).
6. Navigate to the `Cell_ACDC` folder with the command `cd Cell_ACDC`.
7. Add the upstream repository with the command `git remote add upstream https://github.com/SchmollerLab/Cell_ACDC.git`
8. Update conda with `conda update conda`. Optionally, consider removing unused packages with the command `conda clean --all`
9. Create a new conda environment with the command `conda create -n acdc_dev python=3.9`
10. Activate the environment with the command `conda activate acdc_dev`
11. Upgrade pip with the command `python -m pip install --upgrade pip`
12. Install Cell-ACDC with the command `pip install -e .`. The `.` at the end of the command means that you want to install from the current folder in the terminal. This must be the `Cell_ACDC` folder that you cloned before.
13. OPTIONAL: If you need tensorflow run the command `pip install tensorflow`.
### Updating Cell-ACDC installed from source with forking
To update Cell-ACDC installed from source, open a terminal window, navigate to the Cell-ACDC folder and run the command
```
git pull upstream main
```
Since you installed with the `-e` flag, pulling with `git` is enough.
## Running Cell-ACDC
1. Open a terminal (on Windows use the Anaconda Prompt if you installed with `conda` otherwise we recommend installing and using the [PowerShell 7](https://docs.microsoft.com/en-us/powershell/scripting/install/installing-powershell-on-windows?view=powershell-7.2))
2. Activate the environment (conda: `conda activate acdc`, pip on Windows: `.\env\Scripts\activate`, pip on Unix: `source env/bin/activate`)
3. Run the command `acdc` or `cellacdc`
## Usage
For details about how to use Cell-ACDC please read the User Manual downloadable from [here](https://github.com/SchmollerLab/Cell_ACDC/tree/main/UserManual)